> ## Documentation Index
> Fetch the complete documentation index at: https://docs.datafdn.org/llms.txt
> Use this file to discover all available pages before exploring further.
# 암호화 및 복호화
> CDR 임계값 복호화를 사용하여 비밀을 암호화하고 복호화하는 방법을 알아봅니다.
이 가이드는 두 가지 주요 CDR 흐름을 단계별로 안내합니다:
* 온체인에 직접 저장되는 작은 비밀을 위한 `uploadCDR` / `accessCDR`
* 오프체인에 저장되는 더 큰 암호화 파일을 위한 `uploadFile` / `downloadFile`
### 사전 요구 사항
* WASM이 초기화되고 클라이언트가 생성된 [CDR SDK 설정](/developers/cdr-sdk/setup) 완료
## 온체인 vs 오프체인에서 실행되는 작업
| 작업 | 트랜잭션 전송? | 일어나는 일 |
| ---------------------------- | ------------------- | -------------------------------------------------- |
| `observer.getGlobalPubKey()` | 아니요 | DATA Foundation API REST 엔드포인트를 통한 DKG 상태의 순수 읽기 |
| `uploadCDR()` | 예, 2 tx | 로컬 TDH2 암호화와 `allocate()` 및 `write()` |
| `uploadFile()` | 예, 2 tx + 스토리지 업로드 | 로컬 AES 암호화, 스토리지 업로드, 그 후 `allocate()` 및 `write()` |
| `accessCDR()` | 예, 1 tx | 온체인 `read()`, 그 후 오프체인 부분 수집 및 로컬 조합 |
| `downloadFile()` | 예, 1 tx + 스토리지 다운로드 | `accessCDR()`와 암호화된 파일 다운로드 및 로컬 AES 복호화 |
## 비밀 암호화하기
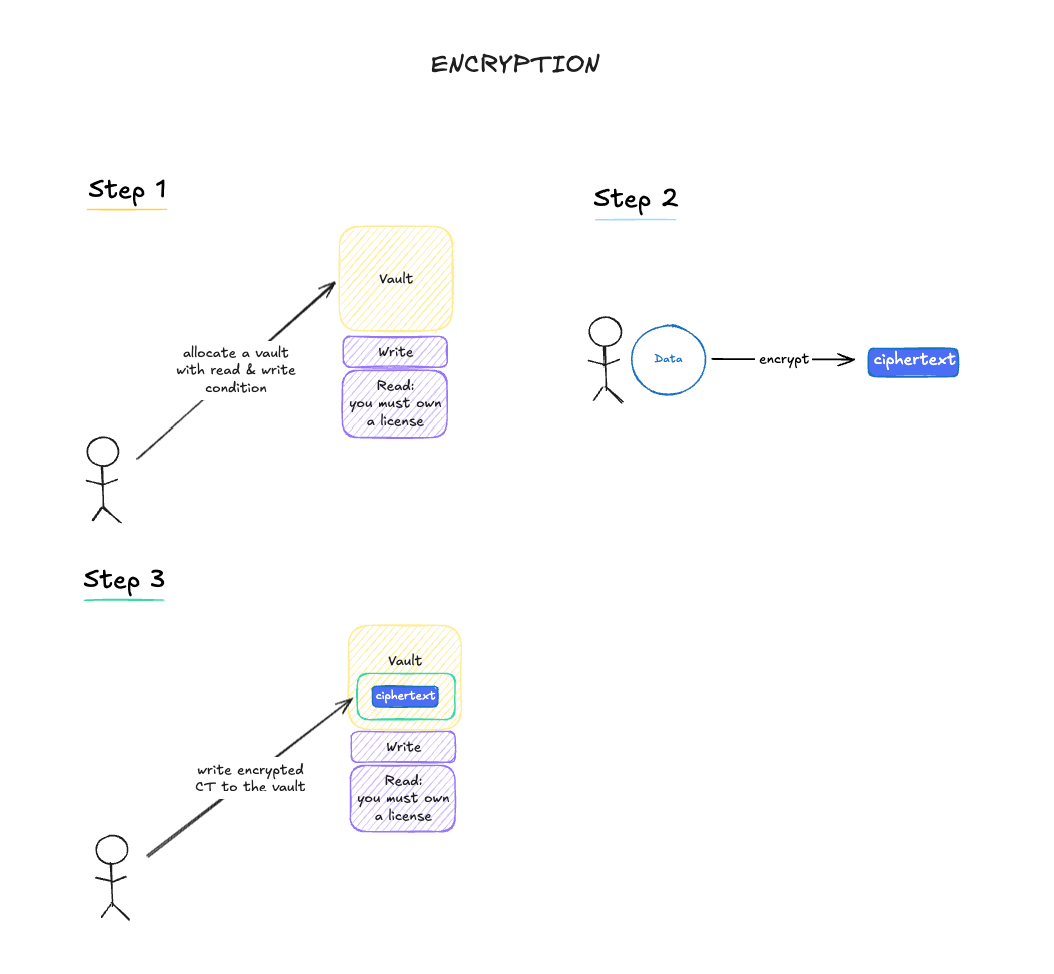
아래 다이어그램은 온체인 비밀 흐름을 보여줍니다: 볼트를 할당하고, TDH2로 비밀을
로컬에서 암호화한 다음, 암호문을 볼트에 기록합니다.
 가장 간단한 "소유자 전용" 패턴은 지갑(EOA) 주소를 쓰기 조건과 읽기 조건 모두로
사용합니다. CDR 컨트랙트는 `msg.sender`가 구성된 조건 주소와 같으면 조건 검사를
건너뛰므로, 해당 지갑만이 볼트에 쓰거나 읽을 수 있습니다. 고수준 `uploadCDR()`
헬퍼는 조건 주소가 배포된 조건 컨트랙트를 가리키는지 검증하기 때문에, EOA
조건은 `skipConditionValidation: true`와 함께 저수준 `allocate()` 호출을 통해
구성됩니다.
```typescript theme={null}
import { initWasm, uuidToLabel } from "@piplabs/cdr-sdk";
import { toHex } from "viem";
await initWasm();
// Assumes `client` and `walletClient` are already created (see Setup)
const { uploader, observer } = client;
const walletAddress = walletClient.account!.address;
// Pure read: fetch the DKG global public key
const globalPubKey = await observer.getGlobalPubKey();
// Encode your secret as bytes
const secret = "my confidential data";
const dataKey = new TextEncoder().encode(secret);
// On-chain transaction: allocate a vault using the wallet address as the
// write AND read condition. Only this EOA can write or read.
const { uuid, txHash: allocateTx } = await uploader.allocate({
updatable: false,
writeConditionAddr: walletAddress,
readConditionAddr: walletAddress,
writeConditionData: "0x",
readConditionData: "0x",
skipConditionValidation: true,
});
// Local: TDH2-encrypt the secret, bound to this vault's UUID
const label = uuidToLabel(uuid);
const ciphertext = await uploader.encryptDataKey({
dataKey,
globalPubKey,
label,
});
// On-chain transaction: write encrypted data to the vault
const { txHash: writeTx } = await uploader.write({
uuid,
accessAuxData: "0x",
encryptedData: toHex(ciphertext.raw),
});
console.log(`Vault created with UUID: ${uuid}`);
console.log(`Allocate tx: ${allocateTx}`);
console.log(`Write tx: ${writeTx}`);
```
어떤 EOA 주소든 쓰기 또는 읽기 조건으로 작동하며, 해당 EOA만이 매칭되는
동작을 수행할 수 있습니다. 한쪽만 게이팅하려면 해당 측에 지갑 주소를
설정하고 다른 측에 조건 컨트랙트(예: `LicenseReadCondition`)를 설정하세요.
고수준 `uploadCDR()` 헬퍼는 양쪽 모두에 배포된 조건 컨트랙트가 있을 것을
기대하며 EOA 조건을 지원하지 않으므로, DATA Foundation 라이선스 게이트
읽기와 같은 패턴([IP Asset Vaults](/developers/cdr-sdk/ip-asset-vaults) 참조)에는
헬퍼를 사용하고, 소유자 전용 EOA 조건에는 위에 표시된 저수준 `allocate()` +
`write()` 흐름을 사용하세요.
트랜잭션의 값은 수수료와 정확히 동일해야 합니다.
`dataKey`는 기존 매개변수 이름입니다. `encryptDataKey()`에서는 단지
암호화 키뿐만 아니라 어떤 비밀 바이트든 될 수 있습니다.
볼트 암호화 데이터는 Aeneid에서 **1024바이트**로 제한됩니다
(`maxEncryptedDataSize`). TDH2는 오버헤드를 추가하므로 최대 평문은 더 작습니다.
더 큰 콘텐츠의 경우, 작은 `{cid, key}` 페이로드만 볼트에 기록되도록
`uploadFile()`을 사용하세요.
## 비밀 복호화하기
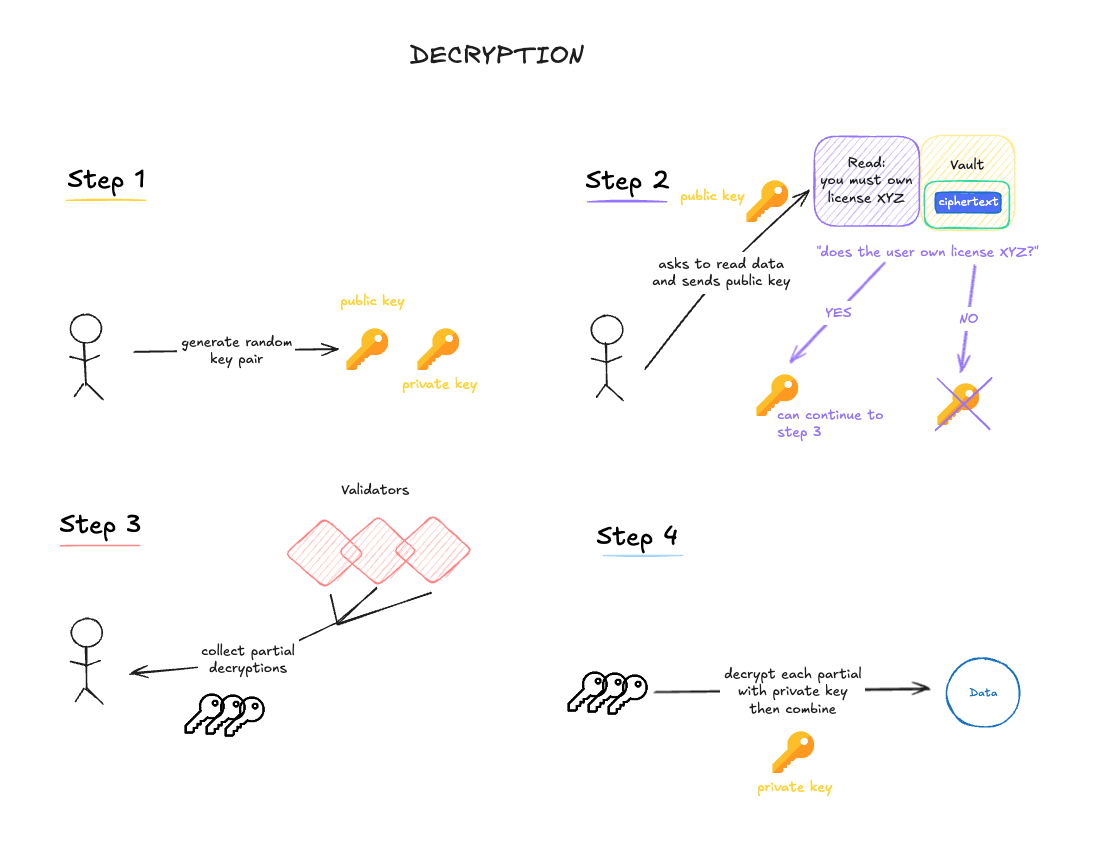
복호화는 온체인에서 읽기 요청을 제출하고, 검증자들로부터 부분 복호화를 수집한 다음,
클라이언트 측에서 조합하는 과정이 필요합니다.
가장 간단한 "소유자 전용" 패턴은 지갑(EOA) 주소를 쓰기 조건과 읽기 조건 모두로
사용합니다. CDR 컨트랙트는 `msg.sender`가 구성된 조건 주소와 같으면 조건 검사를
건너뛰므로, 해당 지갑만이 볼트에 쓰거나 읽을 수 있습니다. 고수준 `uploadCDR()`
헬퍼는 조건 주소가 배포된 조건 컨트랙트를 가리키는지 검증하기 때문에, EOA
조건은 `skipConditionValidation: true`와 함께 저수준 `allocate()` 호출을 통해
구성됩니다.
```typescript theme={null}
import { initWasm, uuidToLabel } from "@piplabs/cdr-sdk";
import { toHex } from "viem";
await initWasm();
// Assumes `client` and `walletClient` are already created (see Setup)
const { uploader, observer } = client;
const walletAddress = walletClient.account!.address;
// Pure read: fetch the DKG global public key
const globalPubKey = await observer.getGlobalPubKey();
// Encode your secret as bytes
const secret = "my confidential data";
const dataKey = new TextEncoder().encode(secret);
// On-chain transaction: allocate a vault using the wallet address as the
// write AND read condition. Only this EOA can write or read.
const { uuid, txHash: allocateTx } = await uploader.allocate({
updatable: false,
writeConditionAddr: walletAddress,
readConditionAddr: walletAddress,
writeConditionData: "0x",
readConditionData: "0x",
skipConditionValidation: true,
});
// Local: TDH2-encrypt the secret, bound to this vault's UUID
const label = uuidToLabel(uuid);
const ciphertext = await uploader.encryptDataKey({
dataKey,
globalPubKey,
label,
});
// On-chain transaction: write encrypted data to the vault
const { txHash: writeTx } = await uploader.write({
uuid,
accessAuxData: "0x",
encryptedData: toHex(ciphertext.raw),
});
console.log(`Vault created with UUID: ${uuid}`);
console.log(`Allocate tx: ${allocateTx}`);
console.log(`Write tx: ${writeTx}`);
```
어떤 EOA 주소든 쓰기 또는 읽기 조건으로 작동하며, 해당 EOA만이 매칭되는
동작을 수행할 수 있습니다. 한쪽만 게이팅하려면 해당 측에 지갑 주소를
설정하고 다른 측에 조건 컨트랙트(예: `LicenseReadCondition`)를 설정하세요.
고수준 `uploadCDR()` 헬퍼는 양쪽 모두에 배포된 조건 컨트랙트가 있을 것을
기대하며 EOA 조건을 지원하지 않으므로, DATA Foundation 라이선스 게이트
읽기와 같은 패턴([IP Asset Vaults](/developers/cdr-sdk/ip-asset-vaults) 참조)에는
헬퍼를 사용하고, 소유자 전용 EOA 조건에는 위에 표시된 저수준 `allocate()` +
`write()` 흐름을 사용하세요.
트랜잭션의 값은 수수료와 정확히 동일해야 합니다.
`dataKey`는 기존 매개변수 이름입니다. `encryptDataKey()`에서는 단지
암호화 키뿐만 아니라 어떤 비밀 바이트든 될 수 있습니다.
볼트 암호화 데이터는 Aeneid에서 **1024바이트**로 제한됩니다
(`maxEncryptedDataSize`). TDH2는 오버헤드를 추가하므로 최대 평문은 더 작습니다.
더 큰 콘텐츠의 경우, 작은 `{cid, key}` 페이로드만 볼트에 기록되도록
`uploadFile()`을 사용하세요.
## 비밀 복호화하기
복호화는 온체인에서 읽기 요청을 제출하고, 검증자들로부터 부분 복호화를 수집한 다음,
클라이언트 측에서 조합하는 과정이 필요합니다.
 ```typescript theme={null}
const { consumer } = client;
// Sends 1 transaction, then collects partials and combines them locally
const { dataKey, txHash } = await consumer.accessCDR({
uuid,
accessAuxData: "0x",
timeoutMs: 120_000, // wait up to 2 minutes for validators
});
const secret = new TextDecoder().decode(dataKey);
console.log(`Read tx: ${txHash}`);
console.log(`Decrypted secret: ${secret}`);
```
`accessCDR()`은 일회용 키 쌍을 자동으로 생성하고, 생략하면 `globalPubKey`를
자동으로 조회합니다. 임계값은 부분 복호화 버킷의 DKG 라운드에서 자동으로
파생됩니다.
서버 측 요청의 타임아웃은 200블록이며, 이는 약 7분에 해당합니다. 이 타임아웃
내에 충분한 부분을 수집하지 못하면 다른 읽기 요청을 시도하세요.
```typescript theme={null}
import { secp256k1 } from "@noble/curves/secp256k1";
import { toHex } from "viem";
const { consumer, observer } = client;
const globalPubKey = await observer.getGlobalPubKey();
const recipientPrivKey = secp256k1.utils.randomPrivateKey();
const requesterPubKey = toHex(
secp256k1.getPublicKey(recipientPrivKey, false),
);
const { dataKey, txHash } = await consumer.accessCDR({
uuid,
accessAuxData: "0x",
requesterPubKey,
recipientPrivKey,
globalPubKey,
timeoutMs: 120_000,
});
console.log(`Read tx: ${txHash}`);
console.log(new TextDecoder().decode(dataKey));
```
## 파일 암호화 및 다운로드
```typescript theme={null}
const { consumer } = client;
// Sends 1 transaction, then collects partials and combines them locally
const { dataKey, txHash } = await consumer.accessCDR({
uuid,
accessAuxData: "0x",
timeoutMs: 120_000, // wait up to 2 minutes for validators
});
const secret = new TextDecoder().decode(dataKey);
console.log(`Read tx: ${txHash}`);
console.log(`Decrypted secret: ${secret}`);
```
`accessCDR()`은 일회용 키 쌍을 자동으로 생성하고, 생략하면 `globalPubKey`를
자동으로 조회합니다. 임계값은 부분 복호화 버킷의 DKG 라운드에서 자동으로
파생됩니다.
서버 측 요청의 타임아웃은 200블록이며, 이는 약 7분에 해당합니다. 이 타임아웃
내에 충분한 부분을 수집하지 못하면 다른 읽기 요청을 시도하세요.
```typescript theme={null}
import { secp256k1 } from "@noble/curves/secp256k1";
import { toHex } from "viem";
const { consumer, observer } = client;
const globalPubKey = await observer.getGlobalPubKey();
const recipientPrivKey = secp256k1.utils.randomPrivateKey();
const requesterPubKey = toHex(
secp256k1.getPublicKey(recipientPrivKey, false),
);
const { dataKey, txHash } = await consumer.accessCDR({
uuid,
accessAuxData: "0x",
requesterPubKey,
recipientPrivKey,
globalPubKey,
timeoutMs: 120_000,
});
console.log(`Read tx: ${txHash}`);
console.log(new TextDecoder().decode(dataKey));
```
## 파일 암호화 및 다운로드
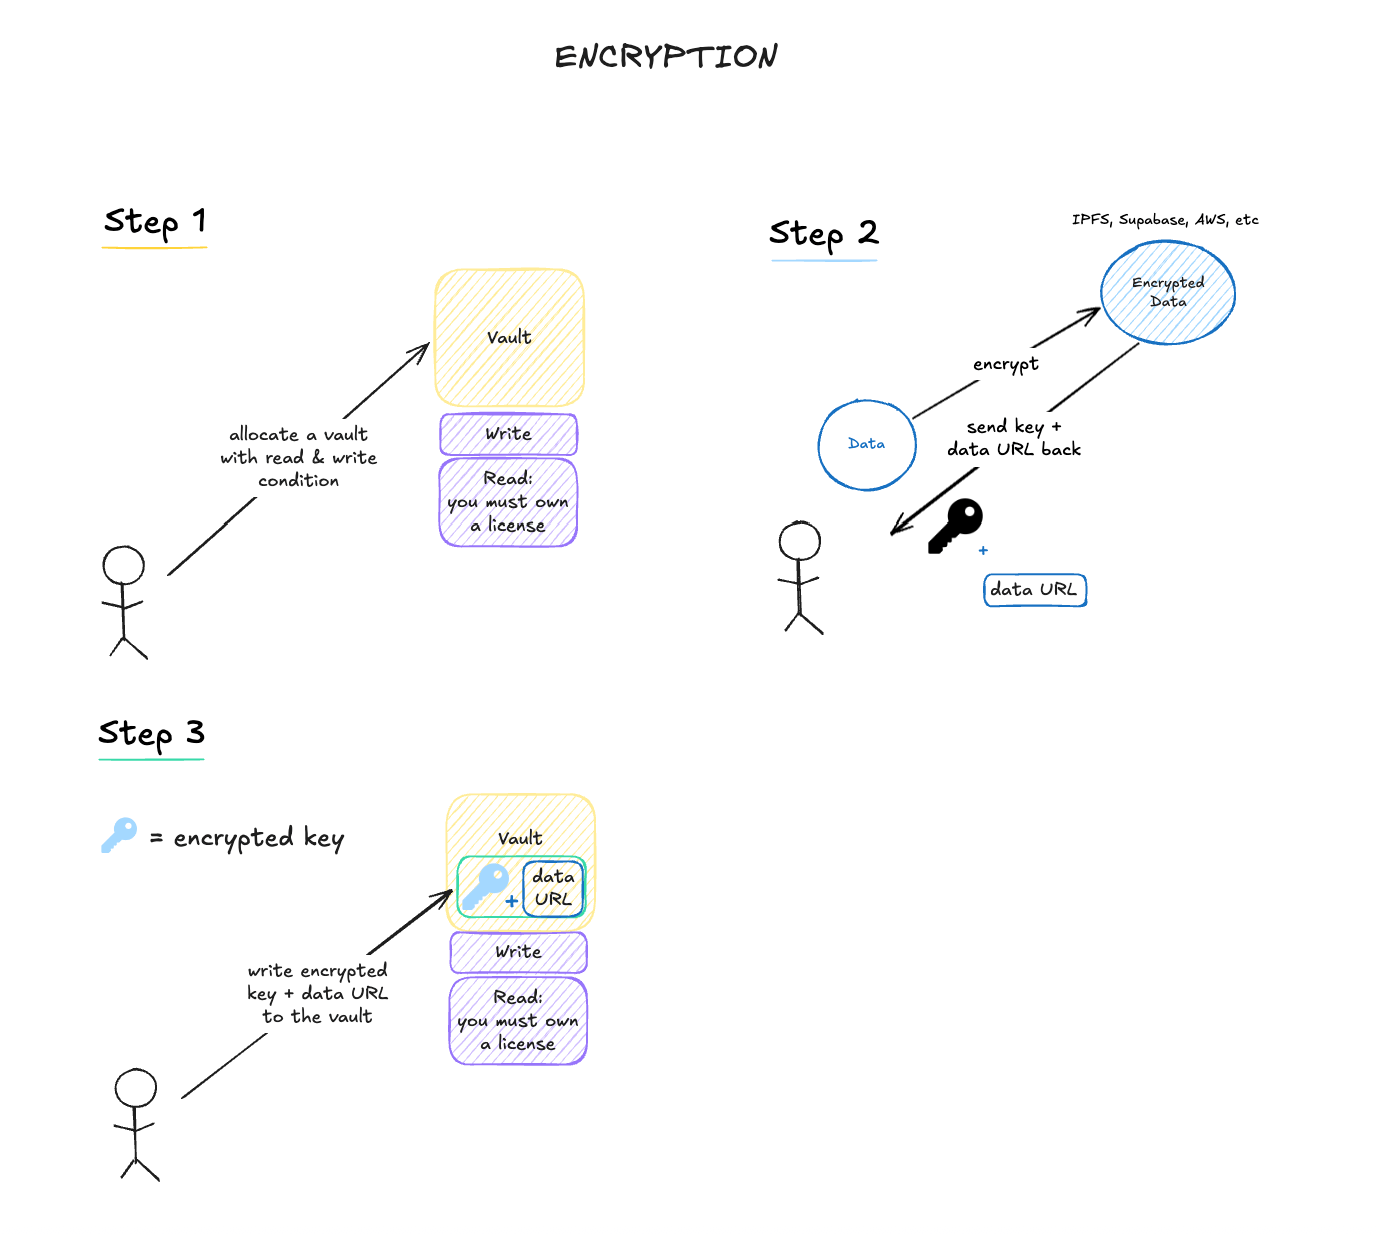
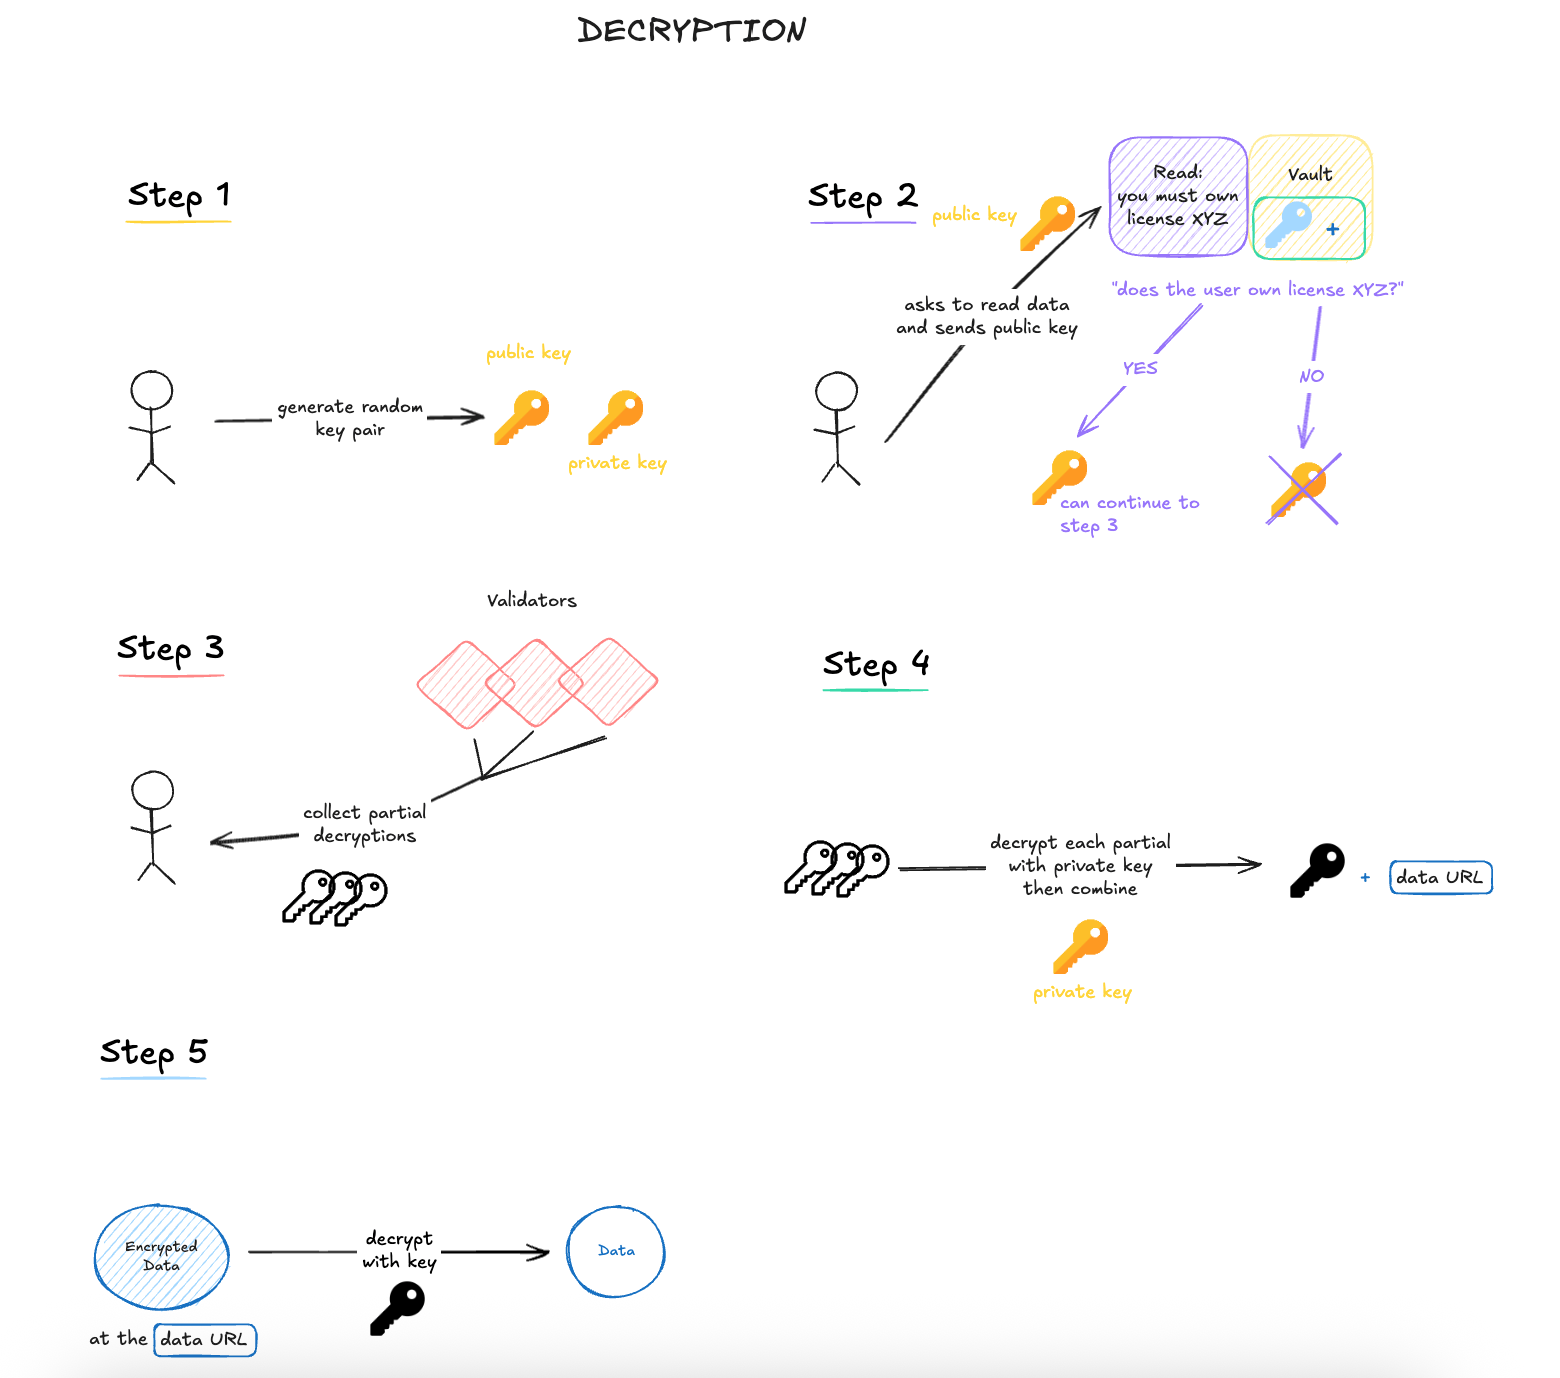 암호화된 페이로드는 오프체인에 보관하고 암호화된 파일 키와 포인터만 볼트에
저장해야 할 때 파일 워크플로를 사용하세요.
업로드는 데이터 소유자가 한 번 수행합니다. 다운로드는 나중에 권한이 있는
독자가 볼트 페이로드를 복구한 후 저장된 파일을 복호화하여 수행합니다.
`uploadFile()` 헬퍼는 양쪽 모두에 배포된 조건 컨트랙트가 필요하므로, 아래
예제에서는 쓰기 측에 DATA Foundation의 `OwnerWriteCondition`을, 읽기 측에
`LicenseReadCondition`을 사용합니다. 라이선스 토큰 보유자는 파일을 복호화할 수
있습니다(엔드 투 엔드 라이선스 설정은 [IP Asset Vaults](/developers/cdr-sdk/ip-asset-vaults)
참조). 소유자 전용 파일 흐름의 경우, 지갑(EOA) 주소를 양쪽 조건 모두로 사용하여
앞서 표시된 저수준 단계를 복제하세요.
```typescript theme={null}
import { HeliaProvider } from "@piplabs/cdr-sdk";
import { readFile, writeFile } from "node:fs/promises";
import { createHelia } from "helia";
import { unixfs } from "@helia/unixfs";
import { CID } from "multiformats/cid";
import { encodeAbiParameters } from "viem";
const uploaderAddress = walletClient.account!.address;
const OWNER_WRITE_CONDITION = "0x4C9bFC96d7092b590D497A191826C3dA2277c34B";
const LICENSE_READ_CONDITION = "0xC0640AD4CF2CaA9914C8e5C44234359a9102f7a3";
const LICENSE_TOKEN = "0xFe3838BFb30B34170F00030B52eA4893d8aAC6bC";
const writeConditionData = encodeAbiParameters(
[{ type: "address" }],
[uploaderAddress],
);
const readConditionData = encodeAbiParameters(
[{ type: "address" }, { type: "address" }],
[LICENSE_TOKEN, ipId],
);
// Pure read
const globalPubKey = await client.observer.getGlobalPubKey();
const helia = await createHelia();
const storage = new HeliaProvider({
helia,
unixfs: unixfs(helia),
CID: (s) => CID.parse(s),
});
const sourceFile = await readFile("./example.pdf");
// Off-chain upload + 2 on-chain transactions
const { uuid, cid } = await client.uploader.uploadFile({
content: new Uint8Array(sourceFile),
storageProvider: storage,
globalPubKey,
updatable: false,
writeConditionAddr: OWNER_WRITE_CONDITION,
readConditionAddr: LICENSE_READ_CONDITION,
writeConditionData,
readConditionData,
accessAuxData: "0x",
});
// 1 on-chain read transaction + off-chain download + local AES decryption
const { content, txHash } = await client.consumer.downloadFile({
uuid,
accessAuxData: "0x",
storageProvider: storage,
timeoutMs: 120_000,
});
console.log(`Stored at CID: ${cid}`);
console.log(`Read tx: ${txHash}`);
await writeFile("./example.decrypted.pdf", Buffer.from(content));
console.log("Decrypted file written to ./example.decrypted.pdf");
```
`HeliaProvider`는 현재 릴리스에서 Aeneid에서 완전히 테스트된 유일한 스토리지
백엔드이며, Node.js 22+가 필요합니다.
`uploadFile()` 및 `downloadFile()`은 원시 파일 바이트로 작동합니다. 브라우저에서는
`File` 객체에서 시작하여 `new Uint8Array(await file.arrayBuffer())`로 변환하세요.
### 스토리지 프로바이더
암호화된 파일 워크플로는 네 가지 스토리지 백엔드를 지원합니다:
* 인-프로세스 IPFS를 위한 `HeliaProvider`. 개발을 위한 최고의 시작점이며 지금까지
Aeneid에서 완전히 테스트된 유일한 백엔드입니다.
* 외부 IPFS HTTP API와 게이트웨이 URL을 위한 `GatewayProvider`.
* Storacha / `web3.storage`를 위한 `StorachaProvider`.
* Synapse를 통한 Filecoin 기반 스토리지를 위한 `SynapseProvider`.
`HeliaProvider`를 사용하는 경우 클래스 불일치를 피하기 위해 위와 같이
생성자에 `CID.parse` 함수를 전달하세요.
## 단계별 가이드 (저수준)
프로세스에 대해 더 많은 제어가 필요한 경우 각 단계를 개별적으로 호출할 수 있습니다.
이 스니펫들은 위 예제의 변수에서 계속됩니다: `walletClient`, `globalPubKey`,
`requesterPubKey`, `recipientPrivKey`, `dataKey`.
### 암호화 (저수준)
```typescript theme={null}
import { uuidToLabel } from "@piplabs/cdr-sdk";
import { toHex } from "viem";
const walletAddress = walletClient.account!.address;
// On-chain transaction: allocate a vault using the wallet address as the
// write AND read condition. Only this EOA can write or read.
const { txHash: allocateTx, uuid } = await uploader.allocate({
updatable: false,
writeConditionAddr: walletAddress,
readConditionAddr: walletAddress,
writeConditionData: "0x",
readConditionData: "0x",
skipConditionValidation: true,
});
// Local: derive the label from the UUID
const label = uuidToLabel(uuid);
// Local: TDH2 encrypt the secret
const ciphertext = await uploader.encryptDataKey({
dataKey,
globalPubKey,
label,
});
// On-chain transaction: write encrypted data to the vault
const { txHash: writeTx } = await uploader.write({
uuid,
accessAuxData: "0x",
encryptedData: toHex(ciphertext.raw),
});
```
### 복호화 (저수준)
```typescript theme={null}
import { uuidToLabel } from "@piplabs/cdr-sdk";
// On-chain transaction: submit read request
const { txHash: readTx } = await consumer.read({
uuid,
accessAuxData: "0x",
requesterPubKey,
});
// Off-chain: poll the DATA Foundation API endpoint for validator partial decryptions.
// The required threshold is derived from the bucket's own DKG round.
const partials = await consumer.collectPartials({
uuid,
requesterPubKey, // the secp256k1 pubkey used in the read request
timeoutMs: 120_000,
});
// Pure read: fetch the vault ciphertext
const label = uuidToLabel(uuid);
const vault = await observer.getVault(uuid);
// Local: decrypt each partial, then combine them
const recoveredDataKey = await consumer.decryptDataKey({
ciphertext: {
raw: Uint8Array.from(Buffer.from(vault.encryptedData.slice(2), "hex")),
label,
},
partials,
recipientPrivKey,
globalPubKey,
label,
});
```
## DKG 상태 조회
지갑이나 WASM 초기화 없이도 DKG 상태와 수수료를 조회할 수 있습니다:
```typescript theme={null}
import { createPublicClient, http } from "viem";
import { CDRClient } from "@piplabs/cdr-sdk";
const publicClient = createPublicClient({
transport: http("https://aeneid.datarpc.io"),
});
const client = new CDRClient({
network: "testnet",
publicClient,
apiUrl: "http://172.192.41.96:1317",
});
const threshold = await client.observer.getOperationalThreshold();
console.log("Operational threshold:", threshold);
const [allocateFee, writeFee, readFee] = await Promise.all([
client.observer.getAllocateFee(),
client.observer.getWriteFee(),
client.observer.getReadFee(),
]);
console.log(
`Fees: allocate: ${allocateFee}, write: ${writeFee}, read: ${readFee}`,
);
// Query a specific vault
const vault = await client.observer.getVault(1);
console.log("Vault:", vault);
```
## 수수료 이해하기
각 CDR 작업에는 온체인 수수료가 있습니다:
| 작업 | 수수료 조회 | 설명 |
| -- | --------------------------- | --------------- |
| 할당 | `observer.getAllocateFee()` | 볼트를 생성하는 일회성 비용 |
| 쓰기 | `observer.getWriteFee()` | 볼트에 쓰기당 비용 |
| 읽기 | `observer.getReadFee()` | 읽기/복호화 요청당 비용 |
수수료는 네이티브 토큰(wei)으로 지불되며 각 트랜잭션과 함께 `msg.value`로 전송됩니다.
암호화된 페이로드는 오프체인에 보관하고 암호화된 파일 키와 포인터만 볼트에
저장해야 할 때 파일 워크플로를 사용하세요.
업로드는 데이터 소유자가 한 번 수행합니다. 다운로드는 나중에 권한이 있는
독자가 볼트 페이로드를 복구한 후 저장된 파일을 복호화하여 수행합니다.
`uploadFile()` 헬퍼는 양쪽 모두에 배포된 조건 컨트랙트가 필요하므로, 아래
예제에서는 쓰기 측에 DATA Foundation의 `OwnerWriteCondition`을, 읽기 측에
`LicenseReadCondition`을 사용합니다. 라이선스 토큰 보유자는 파일을 복호화할 수
있습니다(엔드 투 엔드 라이선스 설정은 [IP Asset Vaults](/developers/cdr-sdk/ip-asset-vaults)
참조). 소유자 전용 파일 흐름의 경우, 지갑(EOA) 주소를 양쪽 조건 모두로 사용하여
앞서 표시된 저수준 단계를 복제하세요.
```typescript theme={null}
import { HeliaProvider } from "@piplabs/cdr-sdk";
import { readFile, writeFile } from "node:fs/promises";
import { createHelia } from "helia";
import { unixfs } from "@helia/unixfs";
import { CID } from "multiformats/cid";
import { encodeAbiParameters } from "viem";
const uploaderAddress = walletClient.account!.address;
const OWNER_WRITE_CONDITION = "0x4C9bFC96d7092b590D497A191826C3dA2277c34B";
const LICENSE_READ_CONDITION = "0xC0640AD4CF2CaA9914C8e5C44234359a9102f7a3";
const LICENSE_TOKEN = "0xFe3838BFb30B34170F00030B52eA4893d8aAC6bC";
const writeConditionData = encodeAbiParameters(
[{ type: "address" }],
[uploaderAddress],
);
const readConditionData = encodeAbiParameters(
[{ type: "address" }, { type: "address" }],
[LICENSE_TOKEN, ipId],
);
// Pure read
const globalPubKey = await client.observer.getGlobalPubKey();
const helia = await createHelia();
const storage = new HeliaProvider({
helia,
unixfs: unixfs(helia),
CID: (s) => CID.parse(s),
});
const sourceFile = await readFile("./example.pdf");
// Off-chain upload + 2 on-chain transactions
const { uuid, cid } = await client.uploader.uploadFile({
content: new Uint8Array(sourceFile),
storageProvider: storage,
globalPubKey,
updatable: false,
writeConditionAddr: OWNER_WRITE_CONDITION,
readConditionAddr: LICENSE_READ_CONDITION,
writeConditionData,
readConditionData,
accessAuxData: "0x",
});
// 1 on-chain read transaction + off-chain download + local AES decryption
const { content, txHash } = await client.consumer.downloadFile({
uuid,
accessAuxData: "0x",
storageProvider: storage,
timeoutMs: 120_000,
});
console.log(`Stored at CID: ${cid}`);
console.log(`Read tx: ${txHash}`);
await writeFile("./example.decrypted.pdf", Buffer.from(content));
console.log("Decrypted file written to ./example.decrypted.pdf");
```
`HeliaProvider`는 현재 릴리스에서 Aeneid에서 완전히 테스트된 유일한 스토리지
백엔드이며, Node.js 22+가 필요합니다.
`uploadFile()` 및 `downloadFile()`은 원시 파일 바이트로 작동합니다. 브라우저에서는
`File` 객체에서 시작하여 `new Uint8Array(await file.arrayBuffer())`로 변환하세요.
### 스토리지 프로바이더
암호화된 파일 워크플로는 네 가지 스토리지 백엔드를 지원합니다:
* 인-프로세스 IPFS를 위한 `HeliaProvider`. 개발을 위한 최고의 시작점이며 지금까지
Aeneid에서 완전히 테스트된 유일한 백엔드입니다.
* 외부 IPFS HTTP API와 게이트웨이 URL을 위한 `GatewayProvider`.
* Storacha / `web3.storage`를 위한 `StorachaProvider`.
* Synapse를 통한 Filecoin 기반 스토리지를 위한 `SynapseProvider`.
`HeliaProvider`를 사용하는 경우 클래스 불일치를 피하기 위해 위와 같이
생성자에 `CID.parse` 함수를 전달하세요.
## 단계별 가이드 (저수준)
프로세스에 대해 더 많은 제어가 필요한 경우 각 단계를 개별적으로 호출할 수 있습니다.
이 스니펫들은 위 예제의 변수에서 계속됩니다: `walletClient`, `globalPubKey`,
`requesterPubKey`, `recipientPrivKey`, `dataKey`.
### 암호화 (저수준)
```typescript theme={null}
import { uuidToLabel } from "@piplabs/cdr-sdk";
import { toHex } from "viem";
const walletAddress = walletClient.account!.address;
// On-chain transaction: allocate a vault using the wallet address as the
// write AND read condition. Only this EOA can write or read.
const { txHash: allocateTx, uuid } = await uploader.allocate({
updatable: false,
writeConditionAddr: walletAddress,
readConditionAddr: walletAddress,
writeConditionData: "0x",
readConditionData: "0x",
skipConditionValidation: true,
});
// Local: derive the label from the UUID
const label = uuidToLabel(uuid);
// Local: TDH2 encrypt the secret
const ciphertext = await uploader.encryptDataKey({
dataKey,
globalPubKey,
label,
});
// On-chain transaction: write encrypted data to the vault
const { txHash: writeTx } = await uploader.write({
uuid,
accessAuxData: "0x",
encryptedData: toHex(ciphertext.raw),
});
```
### 복호화 (저수준)
```typescript theme={null}
import { uuidToLabel } from "@piplabs/cdr-sdk";
// On-chain transaction: submit read request
const { txHash: readTx } = await consumer.read({
uuid,
accessAuxData: "0x",
requesterPubKey,
});
// Off-chain: poll the DATA Foundation API endpoint for validator partial decryptions.
// The required threshold is derived from the bucket's own DKG round.
const partials = await consumer.collectPartials({
uuid,
requesterPubKey, // the secp256k1 pubkey used in the read request
timeoutMs: 120_000,
});
// Pure read: fetch the vault ciphertext
const label = uuidToLabel(uuid);
const vault = await observer.getVault(uuid);
// Local: decrypt each partial, then combine them
const recoveredDataKey = await consumer.decryptDataKey({
ciphertext: {
raw: Uint8Array.from(Buffer.from(vault.encryptedData.slice(2), "hex")),
label,
},
partials,
recipientPrivKey,
globalPubKey,
label,
});
```
## DKG 상태 조회
지갑이나 WASM 초기화 없이도 DKG 상태와 수수료를 조회할 수 있습니다:
```typescript theme={null}
import { createPublicClient, http } from "viem";
import { CDRClient } from "@piplabs/cdr-sdk";
const publicClient = createPublicClient({
transport: http("https://aeneid.datarpc.io"),
});
const client = new CDRClient({
network: "testnet",
publicClient,
apiUrl: "http://172.192.41.96:1317",
});
const threshold = await client.observer.getOperationalThreshold();
console.log("Operational threshold:", threshold);
const [allocateFee, writeFee, readFee] = await Promise.all([
client.observer.getAllocateFee(),
client.observer.getWriteFee(),
client.observer.getReadFee(),
]);
console.log(
`Fees: allocate: ${allocateFee}, write: ${writeFee}, read: ${readFee}`,
);
// Query a specific vault
const vault = await client.observer.getVault(1);
console.log("Vault:", vault);
```
## 수수료 이해하기
각 CDR 작업에는 온체인 수수료가 있습니다:
| 작업 | 수수료 조회 | 설명 |
| -- | --------------------------- | --------------- |
| 할당 | `observer.getAllocateFee()` | 볼트를 생성하는 일회성 비용 |
| 쓰기 | `observer.getWriteFee()` | 볼트에 쓰기당 비용 |
| 읽기 | `observer.getReadFee()` | 읽기/복호화 요청당 비용 |
수수료는 네이티브 토큰(wei)으로 지불되며 각 트랜잭션과 함께 `msg.value`로 전송됩니다.