> ## Documentation Index
> Fetch the complete documentation index at: https://docs.datafdn.org/llms.txt
> Use this file to discover all available pages before exploring further.
# Privy를 사용한 이메일 로그인 및 트랜잭션 스폰서십
> Privy와 Pimlico를 사용해 이메일 로그인과 트랜잭션 스폰서십을 구현하는 방법을 알아봅니다.
이 튜토리얼의 완성된 코드를 확인하세요.
이 튜토리얼을 읽고 있다면 다음 중 하나 또는 둘 다를 하고 싶을 가능성이 큽니다:
1. 지갑이 없는 사용자가 이메일로 로그인할 수 있게 하기("Embedded Wallets")
2. 사용자의 트랜잭션을 스폰서하여 가스비를 지불하지 않게 하기("Smart Wallets")
Privy는 이 둘을 다음과 같이 설명합니다:
> Embedded wallets는 Privy 자체가 프로비저닝한 자체 수탁(self-custodial) 지갑으로, 애플리케이션에 직접 내장된 지갑 경험을 제공합니다. Embedded wallets는 브라우저 확장 프로그램이나 모바일 앱과 같은 별도의 지갑 클라이언트가 필요 없으며, 제품에서 직접 접근할 수 있습니다. 이는 외부 지갑을 아직 가지고 있지 않거나 외부 지갑을 연결하고 싶지 않은 앱 사용자를 위해 주로 설계되었습니다.
>
> Smart wallets는 account abstraction의 기능을 포함하는, 프로그래밍 가능한 온체인 계정입니다. 몇 줄의 코드만으로 사용자를 위한 smart wallet을 만들어 가스비를 스폰서하고, 배치 트랜잭션을 전송하는 등 다양한 기능을 사용할 수 있습니다.
[Privy](https://www.privy.io/) + [Pimlico](https://www.pimlico.io/)를 사용해 두 가지를 모두 구현합니다.
### ⚠️ 사전 준비 사항
튜토리얼을 시작하기 전에 완료해야 할 몇 가지 단계가 있습니다.
1. [Privy 대시보드](https://dashboard.privy.io)에서 새 프로젝트를 만듭니다.
2. **"App settings > API keys"** 아래의 \*\*"App ID"\*\*를 복사합니다. 로컬 프로젝트에서 `.env` 파일을 만들고 App ID를 추가하세요:
```Text .env theme={null}
NEXT_PUBLIC_PRIVY_APP_ID=
```
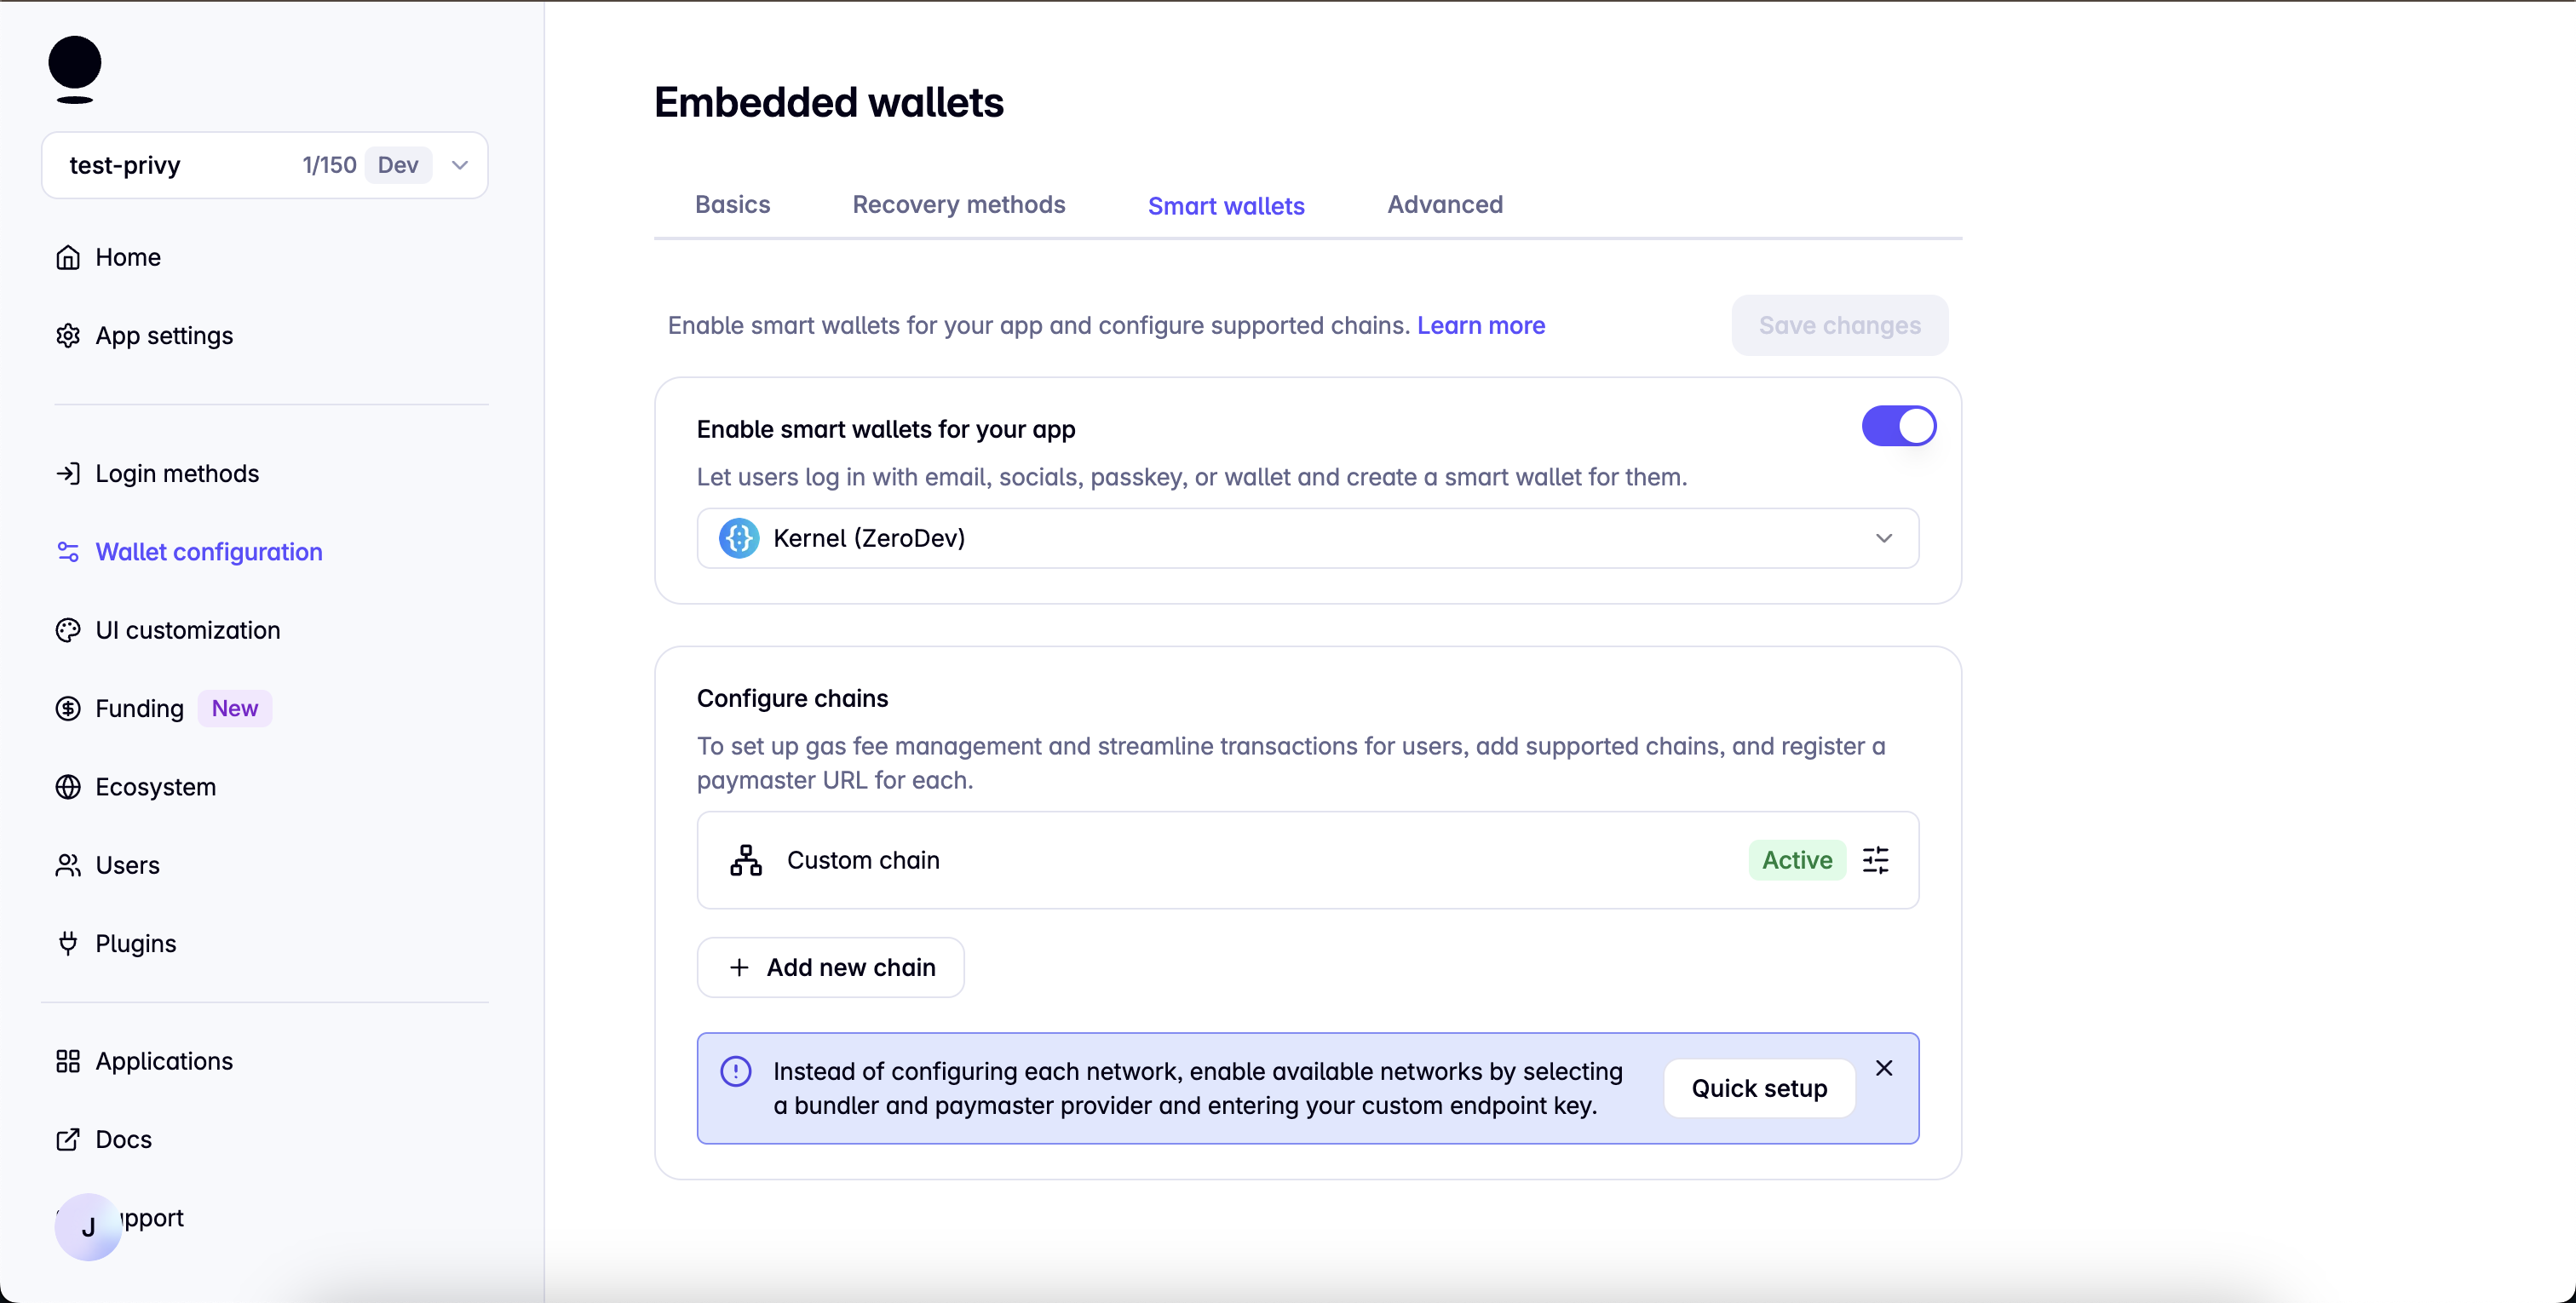
3. 프로젝트 대시보드에서 "**Wallet Configuration > Smart wallets**" 아래의 Smart Wallets를 활성화하고, 아래와 같이 "**Kernel (ZeroDev)**"를 선택합니다:
4. Smart wallets를 활성화한 후, 바로 아래에 다음 값으로 "Custom chain"을 추가합니다:
1. 이름: `Aeneid Testnet`
2. ID 번호: `1315`
3. RPC URL: `https://aeneid.datarpc.io`
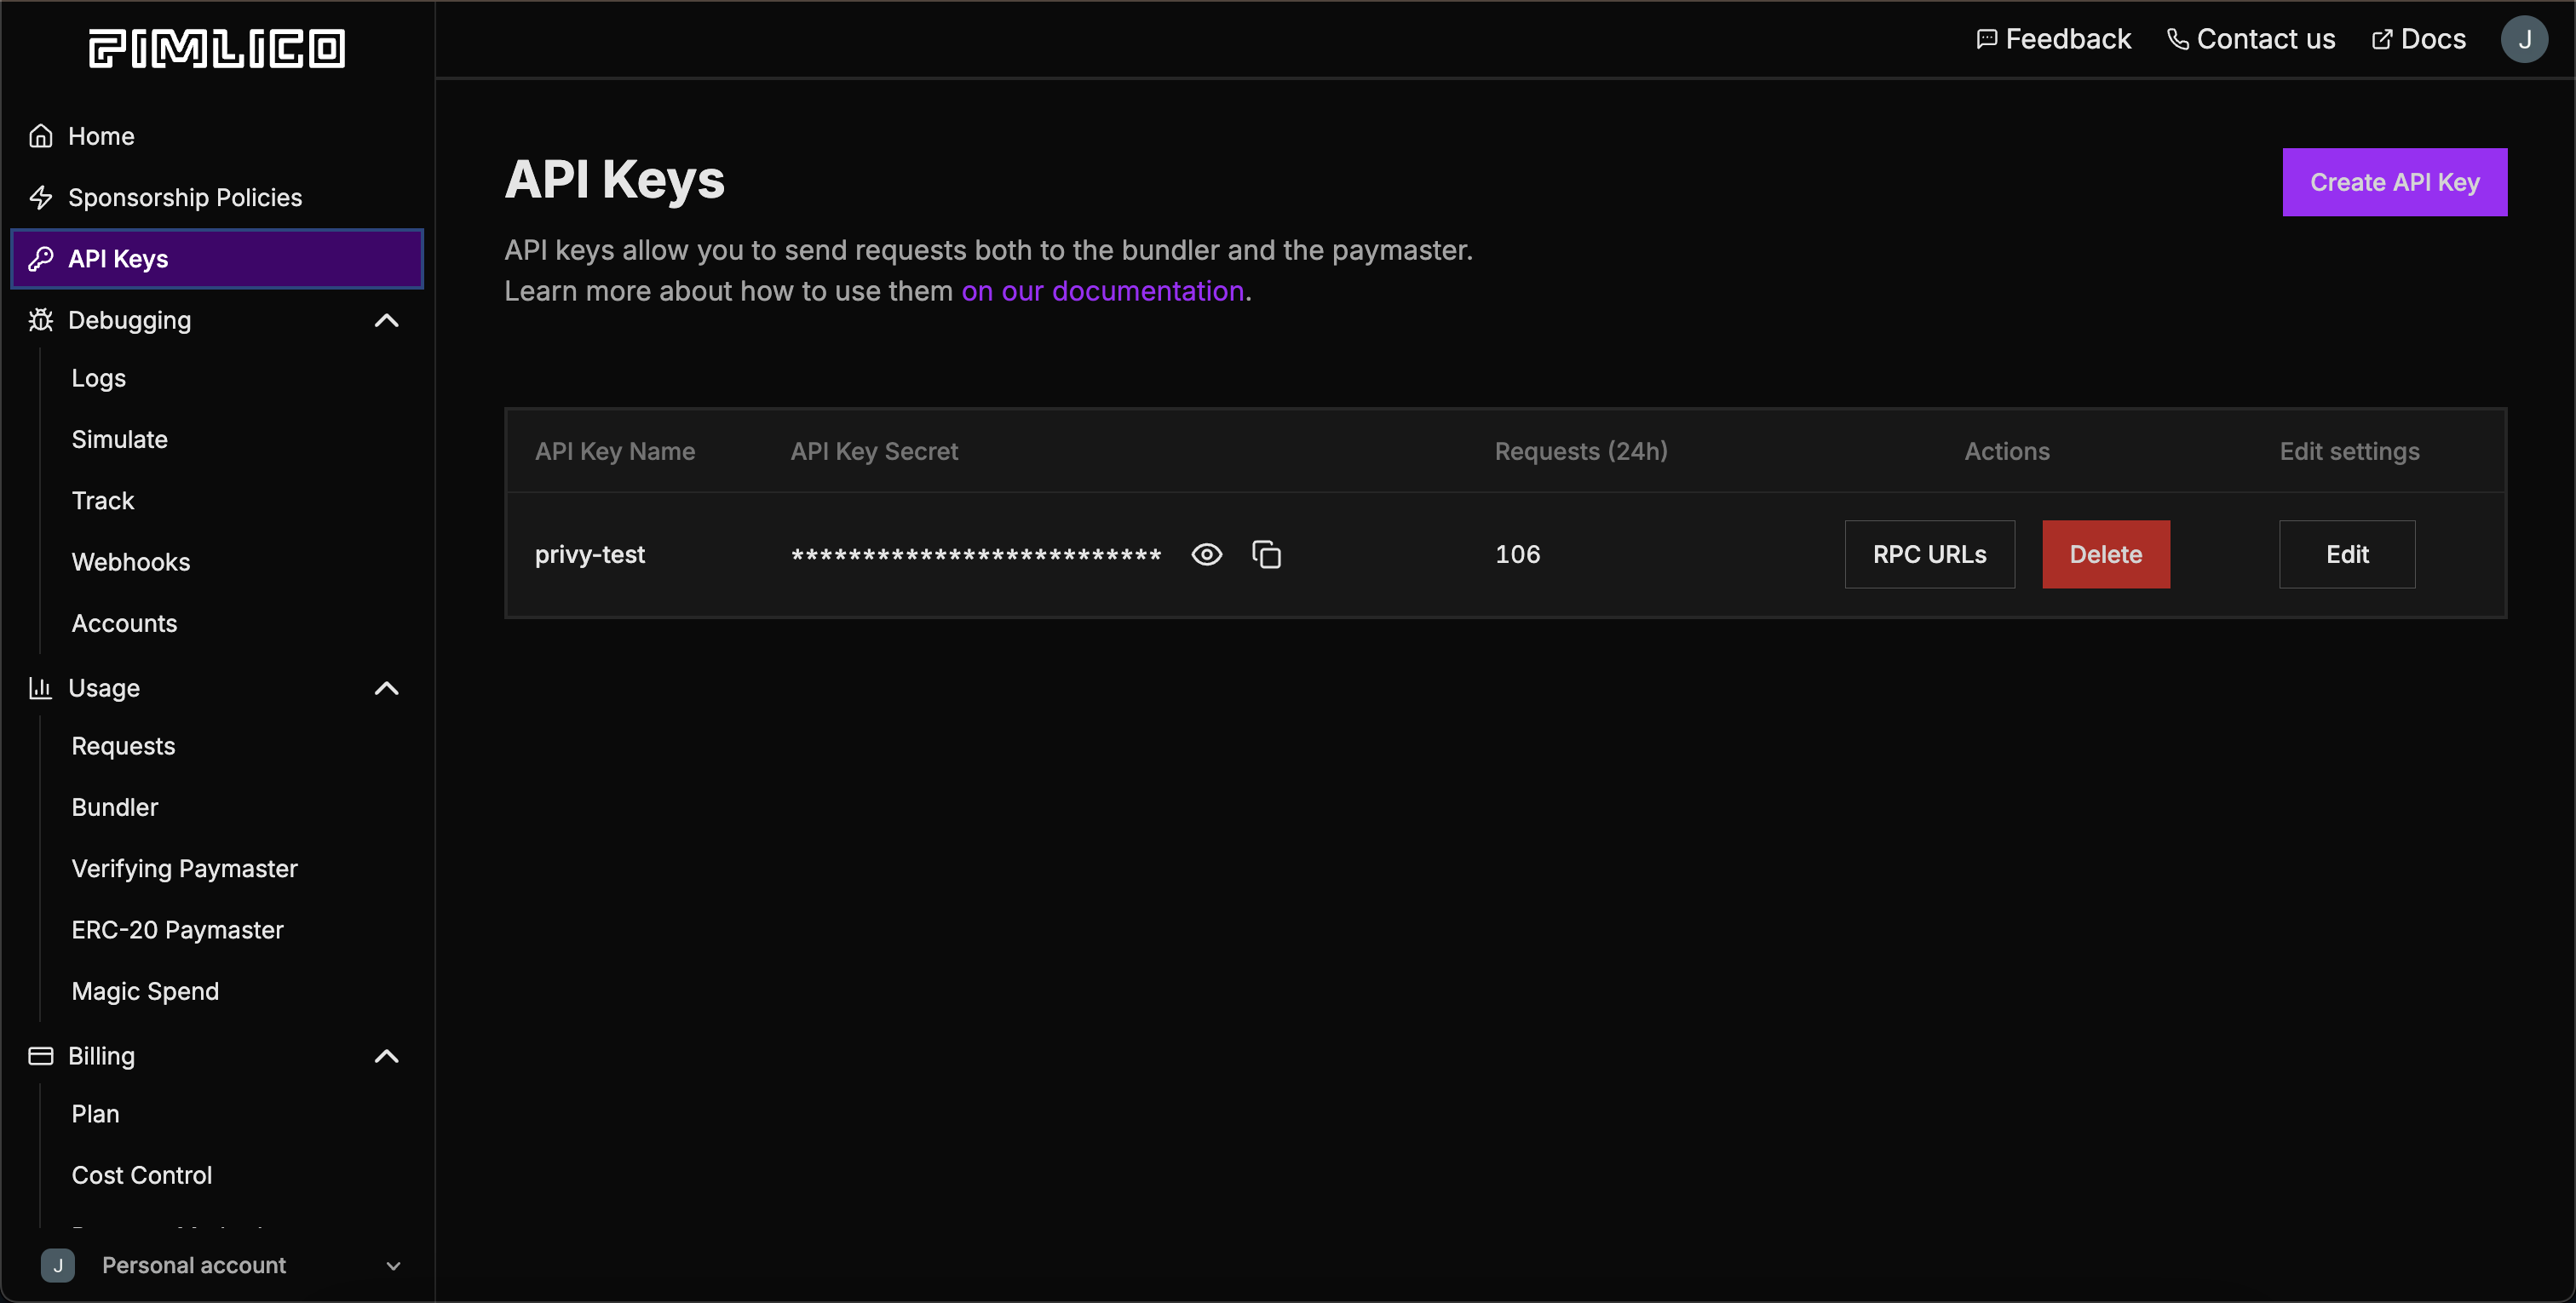
4. Bundler URL과 Paymaster URL은 [Pimlico 대시보드](https://dashboard.pimlico.io)로 가서 새 앱을 만듭니다. 그런 다음 "API Keys"를 클릭하고, 새 API 키를 만들고, 아래와 같이 "RPC URLs"를 클릭한 후 네트워크로 "Aeneid Testnet"을 선택합니다:
이는 테스트용입니다. 실제 환경에서는 Pimlico에서 적절한 스폰서십 정책과 결제 정보를 설정해 앱을 대신해 자동으로 트랜잭션을 스폰서해야 합니다. 테스트넷에서는 이 작업을 할 필요가 없습니다.
5. 의존성을 설치합니다:
```Text Terminal theme={null}
npm install @story-protocol/core-sdk permissionless viem @privy-io/react-auth
```
## 1. Embedded Wallets 설정
이 단계를 읽는 대신 설정을 위해 Privy의 공식 튜토리얼을 따라가세요.
Privy 문서의 이 부분
[여기](https://docs.privy.io/basics/react/advanced/automatic-wallet-creation#automatic-wallet-creation)는
Embedded Wallets를 자동으로 설정하는 방법을 설명합니다. 이는 이메일 로그인을
지원하여 사용자가 이메일로 로그인할 때 자동으로 지갑을 생성한다는 의미입니다.
아래 예제에서는 단순히 모든 사용자에 대해 embedded wallet을 만들지만, 더 많은
커스터마이징을 원한다면 해당 튜토리얼을 참고하세요.
embedded/smart wallets를 사용하는 모든 컴포넌트를 `PrivyProvider`와 `SmartWalletsProvider`로 감싸야 합니다. `providers.tsx`(원하는 이름으로) 파일에 다음 코드를 추가합니다:
```jsx providers.tsx theme={null}
"use client";
import { PrivyProvider } from "@privy-io/react-auth";
import { SmartWalletsProvider } from "@privy-io/react-auth/smart-wallets";
import { aeneid } from "@story-protocol/core-sdk";
export default function Providers({ children }: { children: React.ReactNode }) {
return (
{children}
);
}
```
그런 다음 다음과 같이 `layout.tsx`에 추가할 수 있습니다:
```jsx layout.tsx theme={null}
import Providers from "@/providers/providers";
/* other code here... */
export default function RootLayout({
children,
}: Readonly<{
children: React.ReactNode,
}>) {
return (
{children}
);
}
```
## 2. 로그인 및 로그아웃
다음과 같이 앱에 이메일 로그인을 추가할 수 있습니다:
```jsx page.tsx theme={null}
import { usePrivy } from "@privy-io/react-auth";
export default function Home() {
const { login, logout, user } = usePrivy();
useEffect(() => {
if (user) {
const smartWallet = user.linkedAccounts.find(
(account) => account.type === "smart_wallet"
);
// Logs the smart wallet's address
console.log(smartWallet.address);
// Logs the smart wallet type (e.g. 'safe', 'kernel', 'light_account', 'biconomy', 'thirdweb', 'coinbase_smart_wallet')
console.log(smartWallet.type);
}
}, [user]);
return (
);
}
```
## 3. Privy로 메시지 서명
이 단계를 읽는 대신 메시지 서명을 위해 Privy의 공식 튜토리얼을 따라가세요.
생성된 smart wallet을 사용해 메시지를 서명할 수 있습니다:
```jsx page.tsx theme={null}
import { useSmartWallets } from "@privy-io/react-auth/smart-wallets";
export default function Home() {
const { client: smartWalletClient } = useSmartWallets();
/* previous code here */
async function sign() {
const uiOptions = {
title: "Example Sign",
description: "This is an example for a user to sign.",
buttonText: "Sign",
};
const request = {
message: "IP is cool",
};
const signature = await smartWalletClient?.signMessage(request, {
uiOptions,
});
}
return (
{/* previous code here */}
);
}
```
## 4. 임의의 트랜잭션 전송
이 단계를 읽는 대신 트랜잭션 전송을 위해 Privy의 공식 튜토리얼을 따라가세요.
생성된 smart wallet을 사용해 사용자의 트랜잭션을 스폰서할 수도 있습니다:
```jsx page.tsx theme={null}
import { useSmartWallets } from "@privy-io/react-auth/smart-wallets";
import { encodeFunctionData } from "viem";
import { defaultNftContractAbi } from "./defaultNftContractAbi";
export default function Home() {
const { client: smartWalletClient } = useSmartWallets();
/* previous code here */
async function mintNFT() {
const uiOptions = {
title: "Mint NFT",
description: "This is an example transaction that mints an NFT.",
buttonText: "Mint",
};
const transactionRequest = {
to: "0x937bef10ba6fb941ed84b8d249abc76031429a9a", // example nft contract
data: encodeFunctionData({
abi: defaultNftContractAbi, // abi from another file
functionName: "mintNFT",
args: ["0x6B86B39F03558A8a4E9252d73F2bDeBfBedf5b68", "test-uri"],
}),
} as const;
const txHash = await smartWalletClient?.sendTransaction(
transactionRequest,
{ uiOptions }
);
console.log(`View Tx: https://aeneid.datanetscan.io/tx/${txHash}`);
}
return (
 4. Smart wallets를 활성화한 후, 바로 아래에 다음 값으로 "Custom chain"을 추가합니다:
1. 이름: `Aeneid Testnet`
2. ID 번호: `1315`
3. RPC URL: `https://aeneid.datarpc.io`
4. Bundler URL과 Paymaster URL은 [Pimlico 대시보드](https://dashboard.pimlico.io)로 가서 새 앱을 만듭니다. 그런 다음 "API Keys"를 클릭하고, 새 API 키를 만들고, 아래와 같이 "RPC URLs"를 클릭한 후 네트워크로 "Aeneid Testnet"을 선택합니다:
4. Smart wallets를 활성화한 후, 바로 아래에 다음 값으로 "Custom chain"을 추가합니다:
1. 이름: `Aeneid Testnet`
2. ID 번호: `1315`
3. RPC URL: `https://aeneid.datarpc.io`
4. Bundler URL과 Paymaster URL은 [Pimlico 대시보드](https://dashboard.pimlico.io)로 가서 새 앱을 만듭니다. 그런 다음 "API Keys"를 클릭하고, 새 API 키를 만들고, 아래와 같이 "RPC URLs"를 클릭한 후 네트워크로 "Aeneid Testnet"을 선택합니다:
 5. 의존성을 설치합니다:
```Text Terminal theme={null}
npm install @story-protocol/core-sdk permissionless viem @privy-io/react-auth
```
## 1. Embedded Wallets 설정
5. 의존성을 설치합니다:
```Text Terminal theme={null}
npm install @story-protocol/core-sdk permissionless viem @privy-io/react-auth
```
## 1. Embedded Wallets 설정